
If you’re an avid surfer, you probably cherish your surfboard the same way that some cherish their cars. After all, some of us are spending more money on surfboards than we would care to admit. So it goes without saying that we really should be looking after them.
When you aren’t using your surfboard there’s better places to store it then leaning against the garage wall – you want to keep it somewhere safe, clean, and out of the way. That’s where a solid surfboard rack comes in and if you’re not afraid of some handywork, DIY surfboard racks are not at difficult as you may think.
Whether you have just one surfboard or own a whole collection, you want to make sure that you have a space dedicated just to your boards. A surfboard rack is a perfect way to make sure that your surfboards stay safe and organized. You don’t necessarily have to go out and spend anywhere from $75 to $400 for one that may not fit your space or your surfboards. You can easily make your surfboard rack at home with just a few tools and materials!
Read on to learn how to make your own, with our DIY surfboard racks guide.
Table of Contents
What Type of DIY Surfboard Rack?
The type of homemade surf rack you build will depend on a couple of factors.
Where do you plan to store the surf rack in your house?
If you have a garage, then in most cases, it makes the most sense to store your surfboard there for easy access as you head to the beach. If you do not have a garage or live in an apartment, you might have to get a little creative about where you place your surfboard rack. If surfing is a big part of your life, it’s a great idea to have your boards on display or part of your home decor!
You may want to save space and build a vertical rack or prefer the look of a horizontal rack. If you don’t mind a few holes in your walls, then building a surfboard wall rack is highly recommended. If you’re worried about damaging your walls, or you’re renting an apartment, then you will probably have to build a free-standing surf rack.
How many surfboards do you have?
If you have just one surfboard, it might be easy to find somewhere out of the way to store it, or you can build a small rack to hold your single board. But if you have a collection, you may need a more functional rack as your boards will take up more space.
Also, consider the size of your surfboards and how much space they take up. If they’re over 8 feet, storing your surfboards vertically would conserve more space.
No matter which rack you choose, you must remember to try to keep your DIY surfboard racks project as simple as possible.
What Materials You Need
Building a surfboard rack can be a creative venture, and you can make them out of many different materials, depending on what you can access. You might already have the materials you need to build a simple surfboard rack. Good materials to use are wood, metal, or PVC, but make sure you have the proper tools to cut these materials.
No matter what type of rack you decide to build, you will need a drill.
How to Build a Homemade Surfboard Wall Rack
You’re ready to start your homemade surfboard wall rack! A wall rack is very convenient because you don’t have to worry about it moving and generally doesn’t take up too much space. There’s a couple of options here, the first two will require you to drill holes into a wall so if that’s an issue for you, the 3rd option is the one for you.
1. vertical surfboard rack
2. horizontal rack
3. freestanding surfboard rack
We’ll have a look at each variation below.

1. How to Build a DIY Vertical Surfboard Rack
Materials:
- A long piece of wood (6’ long x 4” wide x 2” deep is a good reference) to serve as the back post to support your boards
- At least two wooden rods that will be space-holders between boards (add one extra post per extra board) one-inch circumference is recommended
- A drill
- Two screws to drill the post into the wall
- Permanent marker if you want to mark where you
Step 1
Take your rods, which will be the space-holders between boards, and measure their circumference. Then, drill appropriate holes in the long piece of wood to hold them.
Step 2
On the long wooden support, measure how many spaces and how wide your surfboards are, then drill the appropriate holes. These holes are where the rods will go to take the load of your surfboard later.
Step 3
Once you’ve measured out the correct amount of space, drill the holes into your long support post to fit your rods, leaving enough space for your boards.
Step 4
Push the rods into their new holes in the long wooden support piece.
Step 5
Once all the posts are in the support back piece, you may attach the stand to the wall. Choose a height that leaves a few inches between the floor and the bottom of your surfboard.
Step 6
Grab your surfboards and slide them into the spaces created on your surfboard wall rack. Feel free to add carpet, a piece of wood, or a mat underneath the rack to ensure that water does not drip to the floor.
2. How to Build a Horizontal Surfboard Wall Rack
This rack is very similar to the vertical one, but the main difference is that you are drilling the rods into two back posts to allow your surfboard to sit horizontally.
Materials:
- Two long pieces of wood to serve as the back post to support your boards – make sure they’re of equal lengths
- Two wooden rods per number of surfboards you plan on storing, a one-inch circumference is recommended
- A drill
- Six screws to drill the posts into the wall
- Permanent marker
Step 1
Take your rods, which will be the space-holders between boards, and measure their circumference. Then, drill appropriate holes in the long back posts.
Step 2
Take your back posts and put them side to side. Mark where you want the holes to go to support each surfboard you will be putting on the rack.
Step 3
Once you’ve measured the space and marked the posts, drill the holes to fit your rods, leaving enough space for your boards.
Step 4
Push the rods into their new holes in the post pieces.
Step 5
Once all the posts are in the support pieces, decide where you want the rack to be on the wall. Measure and mark the places in the wall where each post will be attached. Be sure to have the posts at a distance of ¾ of the length of your boards. For example, if your surfboards are eight feet apart, make sure the posts are six feet apart on the wall.
Step 6
Drill each post into the wall in their marked spots.
Step 7
Grab your surfboards and slide them into the spaces created on your surfboard wall rack. Again, feel free to add carpet, a piece of wood, or a mat underneath the rack to ensure that water does not drip to the floor.
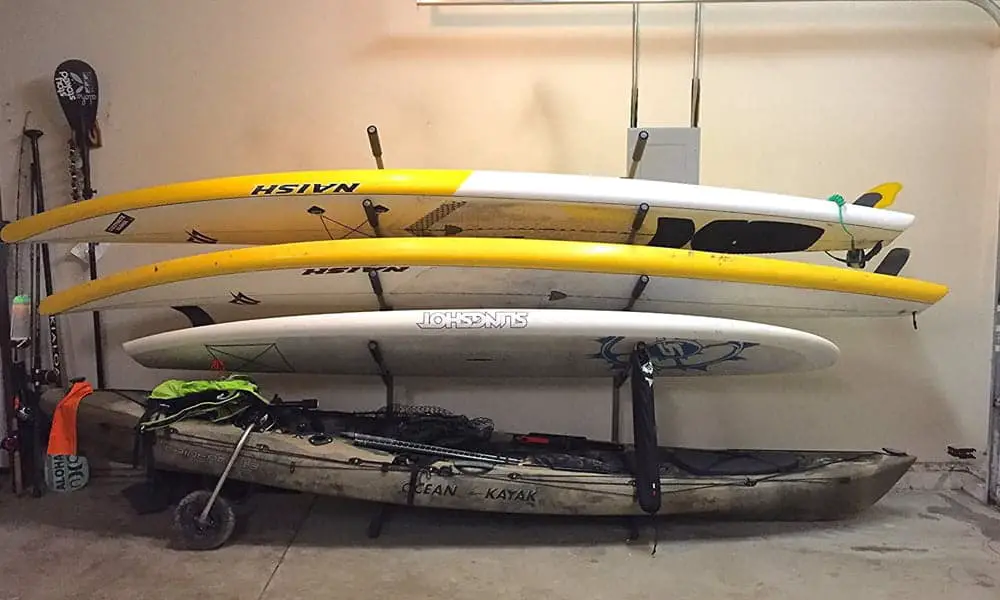
3. How to Build a Freestanding Surfboard Rack
If you can’t drill into your walls, building a freestanding rack is a good alternative. It’s also a convenient option if you want to be able to move your surf rack around.
Materials:
- A long piece of wood (6 feet long x 4” wide x 2” deep is a good reference) to serve as the back post to support your boards
- At least two wooden rods that will be space-holders between boards (add one extra post per extra board)
- Six pieces of wood that can be but to create two right triangles to connect to the back support post. The measurements will vary and will depend on how long your boards are
- A drill
- An assortment of screws
- A large piece of plywood for the base of the rack
Step 1
Create two right-angled triangles. These large right-angle triangles will need to be at least 3/4 of the height of your surfboard and roughly the width of the largest point of your surfboard.
Step 2
Drill the base of your surfboard rack into the bottom of the triangles. If your base is from a long piece of plywood, you can use a mat to cover it if you don’t like the wooden look.
Step 3
On the long wooden support piece, measure how many spaces and how wide your surfboards are. Then, drill appropriate holes into the support piece. These holes are where the rods will go to take the load of your surfboard later on.
Step 4
Once you’ve measured the space out, drill the holes into your long support post to fit your rods, leaving enough space for your boards.
Step 5
Push the rods into their new holes in the long wooden support piece.
Step 6
Drill each side of the long support piece into the top of the right-angle triangle stands.
Step 7
Store your surfboards!
The Takeaway
The three methods above for building DIY Surfboard racks are simple and cost-effective. However, there are numerous other surfboard storage systems and ways to build a surf rack available. It will take some research to figure out what surfboard rack works best for you, but having a storage system in place is worth knowing that your surfboard will always be safe.
Whatever storage system you choose, consider building a surf rack as your next DIY project!